Nox integration
Configure default values for Nox HST devices and assign them to patients.
Ensure the SDI is installed on all scorer workstations.
Note
Typically, the Resmed support team does this configuration.
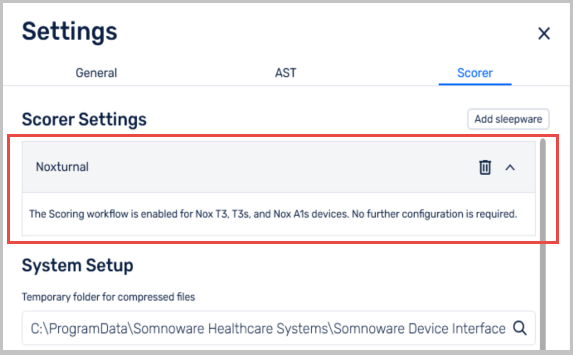
Right-click the SDI system tray icon and select Settings.
From the Scorer tab, click Add sleepware.
From the Sleepware Type list, select Noxturnal.
Click Add Sleepware.
SDI automatically detects the Noxturnal installation location.
The Recording Type is a saved setup that tells Nox devices what signals to record and how to score and report the sleep study. In Noxturnal, you can configure the Recording Type to match the needs of each study, like checking for sleep apnea or doing a full sleep test. Somnoware supports Recording Type selection for Nox A1s and T3 devices only.
In Somnoware, you can select the Recording Type at the facility level or when checking out a device.
Recording Type prerequisites
Contact Resmed support to enable the Recording Type in Somnoware.
Ensure you have SDI 9.24.9.4 or later installed.
Ensure the Nox device version is 7.0 or later.
In the Noxturnal software, ensure you have configured Recording Types. See the Noxturnal documentation for more information.
Set the default values for the facility's Nox device.
Click the Configuration icon (
 ).
).Next to the facility, click the Edit icon.
Click the HST administrations tab.
In the Supported Devices table, next to the Nox HST device, click Set Default Value.
Configure the following:
Recording Type: Select the type of recording patients can perform with this device.
Note
If the Recording Type field is not available, you must enable user selection of the recording type in the Noxturnal software.
Manually start recording: Select this option so the patient can start the recording themselves.
Start recording at: Select this option for the device to start recording at the specified start time.
Number of nights: Enter the total number of nights for the sleep study.
Duration: Set the default number of hours for the device to record.
Start time: If you selected Start recording at, type the time you want the device to start recording the study.
In the Scheduler calendar, click the patient's appointment.
Click Checkout Device.
In the Oximeter Pin field, enter the oximeter PIN number on the Nox T3 device.
Note
If the Oximeter Pin field is not available, you must enable user selection of the recording type in the Noxturnal software.
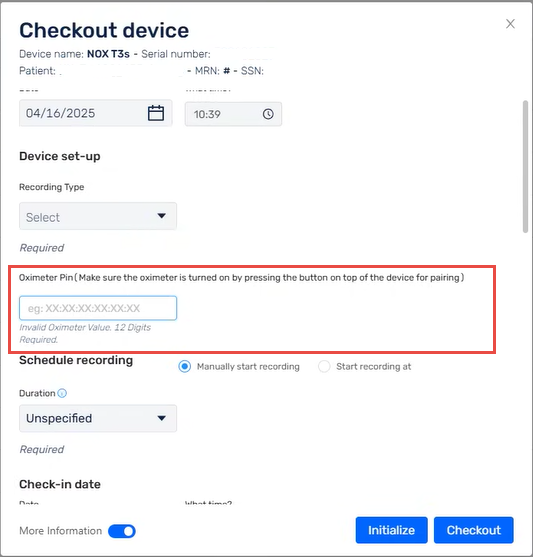
In the Schedule recording section, select:
Manually start recording: The patient starts the recording themselves.
Start recording at: The clinician sets the device to start recording at a specific start time.
Start on Belt: The device starts and stops recording when the patient connects or disconnects the RIP belt.
Click Checkout.
Available data points from Nox HST devices
Starting with Noxturnal version 7.2.1, Somnoware can import and display more data points from Nox home sleep tests. These values come from the ReportParameters.xml file provided by the Nox device and are mapped to Somnoware labels where available.
The following table lists each additional data point available in Somnoware and its XML source name.
Important
These data points are available only with Noxturnal version 7.2.1.
XML node name | Somnoware label |
|---|---|
Pre-PAPSpO2<80%inTSTDuration | Diagnostic_Spo2_below80_Duration |
PAPSpO2<80%inTSTDuration | Titration_Spo2_below80_Duration |
Pre-PAPArousalIndexTST | Diagnostic_Arousal_Index |
PAPArousalIndexTST | Titration_Arousal_Index |
Pre-PAPArousalCountTST | Diagnostic_Total_Arousals |
PAPArousalCountTST | Titration_Total_Arousals |
Starting with Noxturnal version 7.3, Somnoware can import and display the following data points from Nox home sleep tests.
Important
Upgrading device firmware through Noxturnal performs a factory reset as part of the standard Nox upgrade process. The reset clears the stored oximeter pairing information. After upgrading the firmware, users must re-pair the oximeter and synchronize the oximeter PIN before configuring new studies.
XML node name | Somnoware label |
|---|---|
REIWithDesat3Percent | REI |
REIWithDesat4Percent | REI_Alternate |
REINonSupineWithDesat3Percent | REI_NonSupine |
REINonSupineWithDesat4Percent | REI_NonSupine_Alternate |
REISupineWithDesat3Percent | REI_Supine |
REISupineWithDesat4Percent | REI_Supine_Alternate |
HypoxicBurdenNREM | HypoxicBurden_NREM |
HypoxicBurdenNREMNonSupine | HypoxicBurden_NREM_NonSupine |
HypoxicBurdenNREMSupine | HypoxicBurden_NREM_Supine |
HypoxicBurdenREM | HypoxicBurden_REM |
HypoxicBurdenREMNonSupine | HypoxicBurden_REM_NonSupine |
HypoxicBurdenREMSupine | HypoxicBurden_REM_Supine |
HypoxicBurdenSupine | HypoxicBurden_Supine |